Learn how blockchain truly works, master key definitions, and uncover what makes smart contracts so "smart." Dive into the fundamentals, gain valuable insights, and start your blockchain journey today!

- Guides
101 Blockchains
- on October 05, 2021
Hyperledger Fabric Tutorial: Getting Started Guide
In this Hyperledger Fabric tutorial, we will learn how to create your first Hyperledger application and other important things if you are one of the developers who are invested deeply in the blockchain and want to get started with Hyperledger Fabric.
Any enterprise-grade framework requires expertise to work. If you are a novice, you will find yourself struggling a lot to fix small things. That’s why it is important to start early and practice in your own way. But, why Hyperledger Fabric and not any other enterprise Hyperledger blockchain framework?
The reason is that Hyperledger Fabric is a top-notch enterprise blockchain framework that offers great permissioned distributed ledger technology (DLT). It has some great features which make it an ideal choice for an enterprise. Thus, the Hyperledger Fabric tutorial guide can actually help you realize how you can develop an application. So, let’s start the tutorial on Hyperledger Fabric.
Enroll Now: Getting Started with Hyperledger Fabric Course
What is Hyperledger Fabric?
Hyperledger Fabric is an open-source enterprise-grade framework. It relies on permissioned distributed ledger technology to provide much-needed applications and solutions. Linux Foundation is working on a diverse number of projects, and Hyperledger Fabric is one of them.
As it is open-source, anyone can join the project and contribute to it. At the core, Hyperledger Fabric is configurable and modular. This means that enterprises can work seamlessly using the framework. All of these desirable features make Hyperledger Fabric a great choice! At the time of writing, you can try out the Hyperledger Fabric 2.0, which comes with new features and functionalities.
Hyperledger Fabric Functionalities
Hyperledger Fabric comes with five main features. They are as follows
- Identity Management: Identity management is crucial to any permissioned network. That’s why digital identity management is one of the crucial features in the Hyperledger Fabric. By giving the administrator to set proper identity management, enterprises can make sure that they employ multiple layers of permission.
- Efficient processing: Hyperledger Fabric is efficient. This is because network roles are assigned as node types. The efficiency is also provided by letting transaction execution separately from commitment and ordering.
- Modular Design: Hyperledger Fabric utilizes modular design, which means that it is easy to integrate services or other systems into it. This also means that you can specify the consensus algorithm, identity, and so on.
- Privacy and confidentiality: Hyperledger Fabric also offers proper confidentiality and privacy, which is very important for enterprises. They offer proper data channels so that information doesn’t leak and confidentiality can be maintained at any cost.
- Chaincode functionality: Hyperledger Fabric offers chaincode functionality, which enables logic to be invoked only when a specific type of transaction is called.
Introduction to Hyperledger Fabric will also include features like quality code, open-source, great scalability and efficiency, and industry-wide usage.
Hyperledger Fabric Application Tutorial
Before starting to develop an application, it’s better to understand the system architecture of Hyperledger Fabric. By doing so, we can understand how it operates internally. This knowledge then can be used to develop your first Hyperledger Fabric application.
System Architecture
At the core, we have nodes. The nodes communicate with each other and make a network. However, there are programs that are run by the blockchain itself. They are chaincode. The chaincode is responsible for holding ledger and state data and also takes care of transaction execution.
In Hyperledger Fabric, chaincode takes the most emphasis as transactions are carried out on it as operations. Transactions, on the other hand, need to be validated by endorsement. Only endorsed transactions can be committed.
Build your identity as a certified blockchain expert with 101 Blockchains’ Blockchain Certifications designed to provide enhanced career prospects.
Transactions
The transactions on Hyperledger Fabric can be of two types:
- Deploy transactions: This type of transaction is responsible for creating a new chaincode with a parameter as a program. Once done, the chaincode is said to be “installed” on the blockchain.
- Invoke transactions: The invoke transactions are transactions that are executed in the context of previous chaincode or smart contracts deployment.
Blockchain Data Structures
According to Hyperledger Fabric documentation, the basic data structure used in the blockchain is the key-value store (KVS). The keys are mostly names, and the value is blobs. Chaincodes can manipulate the data structure with the help of two following KVS-operation.
- put
- get
The whole data structure is seen as a state.
Ledger
Ledger is the sequence of successful state changes and unsuccessful attempts, as well. They are ordered so that they can be referenced later on. Also, they are ordered hashchain blocks of transactions. The ledger contains blocks in order, which in return contain an ordered transaction array. Here, the blockchain records transactions within the ledger.
Nodes
Nodes can be any communication entity within the network.
Client
A client is someone who can act on the end-users behalf.
Peer
Peer handles the state of the ledger and ensures that the network works optimally. The peers can be endorsing peers, which helps endorse a transaction. The peer-to-peer network in Hyperledger Fabric is an important factor when it comes to transactions.
Writing Your First Hyperledger Fabric Application
Now that you had the Introduction to Hyperledger Fabric and architectural structure, it is now time to create your first application. By going through the application, you will be able to understand how Fabric applications work. In this Hyperledger Fabric application tutorial, you will learn how to build a blockchain app using smart contracts and other applications within the framework.
According to Hyperledger Fabric documentation, to make our development easier, we will be using the application SDK for easy reference to key functions, including invoking smart contracts and other queries.
The three principal steps that you need to follow while developing your Hyperledger fabric app include the following:
- Setup the development environment. The development environment gives your application the necessary network to work with. It will give you the ability to make your smart contract work as well.
- Learning about sample smart contracts. Here, you have to go through the smart contract and understand its transactions. We will run queries as simulated by applications and also update the ledger using it.
- Developing a sample application: In the last step, you will create a sample application using the smart contract.
Curious to understand the complete smart contract development lifecycle? Join the Standard & Premium Plans and get free access to the Smart Contracts Development Course Now!
Building First Network
Before we start with the application, let’s build our first network. To get started, we need to install some prerequisites. These prerequisites will ensure that everything runs as intended.
You may want to install binaries, samples, and docker images. Once you install the samples, you will find the fabric samples included within them. It should be included within the “fabric samples” repository. In the repository, there is the first-network sample.
To move to that directory, move to the folder with the cd command as below.
cd fabric-samples/first-network
To run the first-network sample, you need to make use of the byfn.sh script. The script is designed to start the project with four peers quickly. The four peers are representing two different organizations. It will also launch a container, a chaincode, and transactions. The container will enable more peers to join the network.
Also Check: Top 10 Hyperledger Development Tools 2021
Generating Network Artifacts
You can now generate the certificates, private key and public key for the network entities. To do so, you need to run the following command.
.byfn.sh generate
You will be asked for confirmation before the process starts. Press Y to fill the network with the necessary information, including powering the ordering services, configuration, etc.
Powering the Network
According to Hyperledger Fabric documentation, next, we need to power the network. Powering the network can be done with the simple command below.
./byfn.sh up
Once you run the command, the enterprise blockchain framework will compile the Golang chaincode images. In addition, the associated containers will also fire up to provide new peers with a way to join the network.
By default, you will see Go in action. That’s because Go is the chaincode default language. But that doesn’t mean you cannot use other programming languages. Chaincode also supports Node.js and Java. To change to a node, you can use the following command.
.byfn.sh up -l node
Similarly, you can change to Java if you need to.
.byfn.sh up -l java
If you wish to use multiple chaincode languages, then you need to use an ordering service, including Raft or Kafka.
./byfn.sh up -o etcdraft
./byfn.sh up -o kafka
Each time you use the command, you will ask to confirm once again before the command is executed.
Hyperledger Fabric Tutorial: Launching the Network
Now that you have installed samples and have gone through the prerequisite page, it is now time for us to launch the network.
For the sake of simplicity, we are not going to use JavaScript. Also, you need the fabcar subdirectory. Make a fabric-sample repo local clone as well.
To start the network, you need to use the startFabric.sh shell script. Once launched, you will get a blockchain network that has certificate authorities, orderers, peers, and so on. As fabcar subdirectory is being used, the FabCar smart contract will automatically be installed and initiated.
The command to start the network is as below:
./startFabric.sh javascript
Installing the application
Now, it is time to install the blockchain application. But, before we do that, we need to install the dependencies.
npm install
The above command will start installing the important dependencies that are defined in the package.json
In the package, the important classes that will be initiated include
- fabric-network class: enables transactions, identities, wallets
- fabric-ca-client: register users to their respective certificate authorities
Once done, we will move to the fabcar/javascript directory. Let’s look at the directory files below:
- encrollAdmin.js
- node_modules
- package.json
- registerUser.js
- invoke.js
- package-lock.json
- query.js
- wallet
Start your blockchain journey Now with the Enterprise Blockchains Fundamentals – Free Course!
Communicating with the Certificate Authority
Now that we have a running network, let’s learn how to communicate with a certificate authority.
Certificate Signing Request (CSR)
Our first task is to go through a process of CSR. In this process, the admin contacts the certificate authority to generate the public, private and X.509 certificates. The program used to do is enroll.js
To enroll the admin, use the following command.
node enrollAdmin.js
All the information is now stored in the wallet directory.
The same process needs to be followed if you want to register another user. Let’s try to register another user — usernew
node reisterUser.js
This will register the new user and store its credentials in the wallet alongside the admin.
Start learning Blockchain with World’s first Blockchain Skill Paths with quality resources tailored by industry experts Now!
Querying Ledger
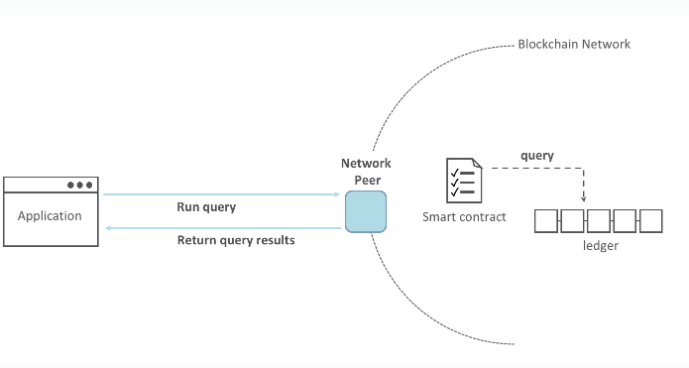
As the blockchain network has a copy of the ledger, you can query it to find information. Ledgers are read-only, and that’s why only read queries can be executed. To get a better understanding, let’s check out the image below.

Source: Hyperledger Fabric Docs
The values on the ledger also stay in their world state. This is the key-pair value that is discussed earlier in the Hyperledger Fabric tutorial guide. So, a query can reveal data from keys. The good news is that you can utilize databases such as CouchDB. The world states can be configured to use relational databases.
Blockchain technology and relational database are not the same things. Here’s a comparison guide to blockchain vs relational database that will help you understand their differences.
To get the list of all cars on the ledger, run the following command,
node query.js
To better understand how querying works, you may want to open up query.js file and go through it. Let’s go through it below.
const { FileSystemWallet, Gateway } = require(‘fabric-network’);
In the above line, a network connection is made
Then, a gateway is created for the application to connect. It is done using the lines below.
const gateway = new Gateway();
await gateway.connect(ccp, { wallet, identity: ‘user1’ });
The ccp is used to identify the user identity and related wallet information.
As the Hyperledger Fabric network runs multiple channels, it is important to connect to the particular channel for the application.
const contract = network.getContract(‘fabcar’);
Understanding the Smart Contract
There are many smart contract use cases that you can implement in your application. But for that, you need to learn how to use it. To get a better understanding of the smart contract, let’s go through it. It will also showcase the transactions made through it.
To access it, you need to go to the subdirectory chaincode/fabcar/javascript/lib. Once there, open up the fabcar.js in an editor.
There you will see the use of the Contract class to define the smart contract. Moreover, there would be clear transactions defined within the smart contract, including queryCar, queryAllCars, initLedger, changeCarOwner, and createCar.
The transactions would look like below:
async queryCar(ctx, carNumber) {…}
Let’s look at queryCar transaction.
async queryAllCars(ctx) {
const startKey = ‘CAR0’;
const endKey = ‘CAR999’;
const iterator = await ctx.stub.getStateByRange(startKey, endKey);

Source: Hyperledger Fabric Docs
Updating Ledger: Buying A New Car
The last step is to update the ledger with new information. In this case, let’s create a new car by using the invoke.js. You need to open the file and add the following command to it.
await contract.submitTransaction(‘createCar’, ‘CAR12’, ‘CarBrand’,’Model’, ‘Color’, ‘Owner’);
In the above code, the app calls createCar smart contract transactions. It will, in return, create the car with its attributes, including CarBrand, Color, Model, and Owner.
Now, run the following code to push it to the ledger
node invoke.js
This will result in a ledger update, and you will get a successful output.
Start learning Smart Contracts and its development tools with World’s first Smart Contracts Skill Path with quality resources tailored by industry experts Now!
Conclusion
This leads us to the end of our Hyperledger Fabric tutorial guide. In the Hyperledger Fabric application tutorial, our aim was to cover only the surface. If you want to dive deep, you can check out their official Hyperledger Fabric documentation, which discusses everything in detail. You can also enroll in our get started with Hyperledger Fabric course, which will also cover a lot of aspects of Hyperledger development.


