
Learn how blockchain truly works, master key definitions, and uncover what makes smart contracts so "smart." Dive into the fundamentals, gain valuable insights, and start your blockchain journey today!

- Opinions
101 Blockchains
- on January 26, 2021
How to Build A Blockchain App
Are you looking for a guide where you can learn how to build a blockchain app? Here’s a guide that can help you to build a blockchain app from scratch.
In this article, we will be building our blockchain app. Recently, we covered how to build a blockchain. It was a complete guide to building a blockchain in the Python programming language. The main focus of the tutorial is to learn about blockchain technology and its inner workings.
This tutorial, however, is on how to build an app using blockchain. The decentralized app (dApp) will be able to take advantage of the blockchain properties.
We will build a simple blockchain app using Ethereum. Ethereum is a second-generation blockchain technology that provides advanced features such as smart contracts, Proof-of-Stake, and, most importantly, the ability to create decentralized apps (dApps).
So, let’s get started with our “How to build a blockchain app” tutorial. This tutorial is also aimed at those who are looking to build a simple blockchain app. To build a simple blockchain app, we are going to use the Ethereum network.
Build your identity as a certified blockchain expert with 101 Blockchains’ Blockchain Certifications designed to provide enhanced career prospects.
What is dApp?
The first step that we are going to take in how to build a blockchain app tutorial is first to learn the concept of the decentralized application (dApp). dApp stands for decentralized application. It is a different type of app that offers key characteristics, including the ability to operate autonomously. The app also stores data cryptographically so that no one unauthorized entity can access it without proper authorization.
All these characteristics make decentralized apps very useful in the current enterprise environment. The apps are also capable of using tokens that can be used to take advantage of the features offered by the app. Moreover, the app can also distribute tokens to incentivize the nodes that are participating in making the dApp functional.
Choosing a Platform – Why We Are Picking the Ethereum Platform
Right now, there are many platforms that you can choose to build your dApp. They include popular blockchain platforms such as Ethereum, Hyperledger Fabric, and Cardano. Out of all of these, Ethereum seems to be the best pick because of the active community, tools, and tutorials available online.
Another reason why we pick Ethereum is that it uses Solidity. Solidity is explicitly made to deploy and create dApps and smart contracts. It is easy to learn and gives you the flexibility to experiment.
Want to learn about the ethereum fundamentals? Enroll now in Ethereum Development Fundamentals Course
Practical Guide for Building A Decentralized Blockchain app
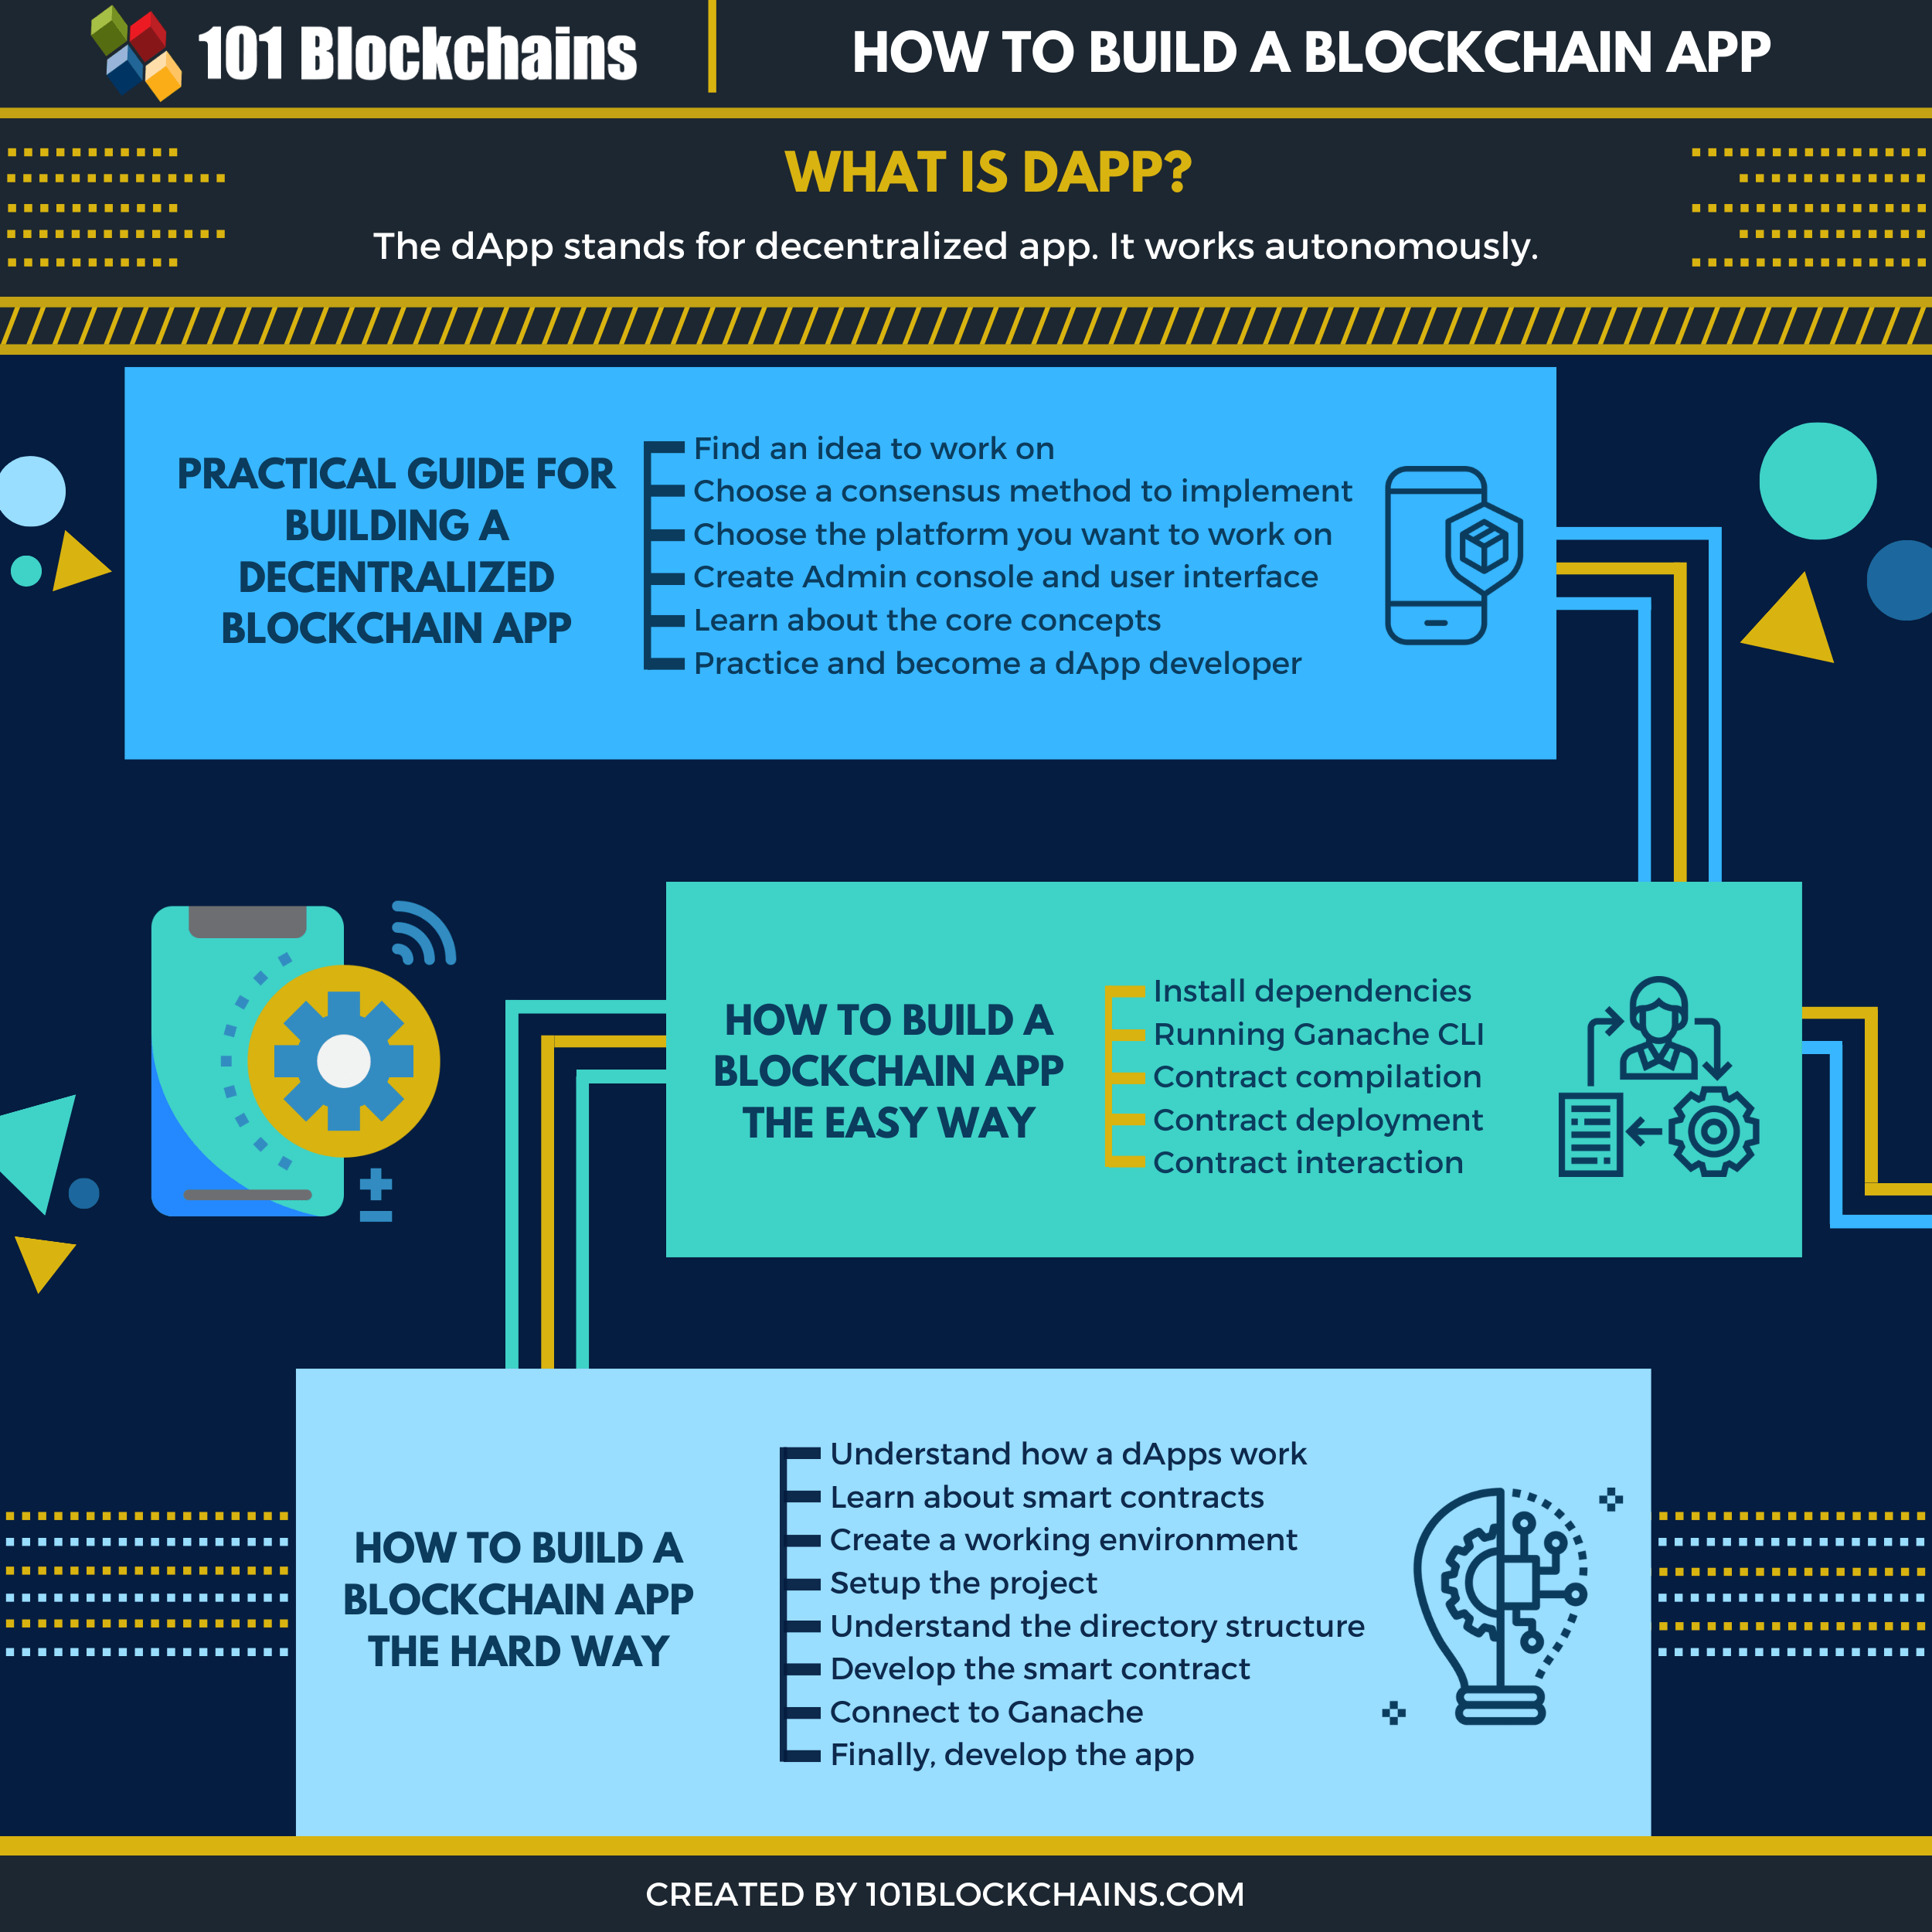
Please include attribution to 101blockchains.com with this graphic. <a href='https://101blockchains.com/blockchain-infographics/'> <img src='https://101blockchains.com/wp-content/uploads/2020/01/How-to-build-a-blockchain-app.png' alt='How to build a blockchain app='0' /> </a>
Before we go and dive deep into code, I would like to list the steps that outline the process of building a blockchain app. Let’s go through it below.
-
Find an Idea
The first step is to find an idea to work on. Decentralization is a cool new concept that can have many use-cases. As a learner or an engineer, you should come up with a useful idea that can either benefit you or your company. Also, do not worry if you cannot come with an idea that changes the landscape. It is okay to build simple dApps just for the sake of learning and practice.
You can also search for issues that you face with blockchain and maybe try to solve them to your best effort. The point here is to view the problem from your pain point and then try to solve it.
If you are trying to build a dApp for your business or according to your business requirements, then you need to do a proper cost/benefit analysis. You also need to explore the risks associated with the project and see if your business team can manage the app with due diligence.
In any circumstances, you should not take any hasty decision that you will regret later. This is because blockchain development is costly, especially when it comes to finding the talent to develop and manage it. On top of that, there is a scarcity of developers who work on the blockchain. In short, you should take proper steps when it comes to blockchain or blockchain app development.
Here’s a guide to dApps development that can you understand the mechanisms behind creating a new decentralized application.
-
Choose A Consensus Method
Any decentralized app requires a proper consensus algorithm to work. It ensures that the transactions are validated, and no frauds can take place. As a developer or learner, you need to choose from any of the available consensus methods, including Proof of Stake, Delegated Proof of Stake, Byzantine fault-tolerant, and so on! The choice should depend upon your familiarity and app requirements.
-
Choosing A Platform
Here, you need to choose a platform of your choice. Clearly, we already covered the point above. You mainly have three platforms to choose from, including Ethereum, Hyperledger Fabric, and Cardano.
There are many enterprise blockchain frameworks you can use for this, but we are going to go with Ethereum.
Start your blockchain journey Now with the Enterprise Blockchains Fundamentals
-
Admin Console and User Interface
Apps should have a proper user experience. That’s why you should build a blockchain app with a good user interface. The app should also have an admin console so that you can manage it without trouble.
-
Understanding Blockchain Principles
It is common for developers to start blockchain app development tutorial without understanding the underlying concepts and principles. That’s why I recommend the blockchain basics entirely before starting with the app development tutorials. You may also want to read about its ecosystem, including blockchain tools, platforms, and cryptocurrencies.
-
Practice and Develop
Practice your skills as much as you can. This will give you the skills to develop more complex apps in the future.
How to Build a Blockchain App? The Easy Approach
Yes, you read it right. In this section, our focus would be to create a straightforward blockchain app in just five simple steps. If you have never built a blockchain app, then these five steps will help you understand the process better.
The five steps are as follows.
- Install dependencies and clone repositories.
- Running Ganache CLI
- Contract compilation
- Contract deployment
- Contract interaction
And, that’s all. You can find more detailed steps on the post itself. It is a simple voting app on blockchain.
How to Build a Blockchain App? The Hard Approach
Alright! You got me! You do not want the easy way, but want to learn blockchain the hard way. Do not worry, as, in this section, we are going to create a todo list app using Ethereum smart contracts.
-
Blockchain Application Workings
Before we dive deep into creating a blockchain app, let’s try to understand how a blockchain application would work in the first place.
To understand that, let’s take a look at how a simple app works. Any app that works on the internet is rendered on the user’s computer using a browser or a dedicated app on windows. In any case, it requests the server for the pages or information, which is then rendered on the user’s computer.
In the case of the web application, everything is centralized. This does offer some benefits; however, it leaves a lot to be desired when it comes to security. Blockchain apps work entirely differently. Everything is decentralized, including the code and the data that is stored in the app.
- Smart Contracts
The key here is the smart contract. A smart contract facilitates the app itself. It contains all the code that makes the app work. It also automates the process and ensures that it works as intended. In our tutorial, we are going to use smart contracts to write the different functionalities of the to-do list.
Smart contracts utilize the Solidity programming language. It is similar to JavaScript. Once a smart contract is written, its code becomes unchangeable and immutable. You are free to change the code while you deploy. However, once the app is deployed, you will not be able to change the code. This is done to bring trustability and security to blockchain apps. The approach also means that you need to be extra careful and do all the testing before deploying the smart contract. Also, smart contract codes are public in nature.
Want to know the real-world examples of smart contracts and understand how you can use it for your business? Check the presentation Now on Examples Of Smart Contracts
-
Making Our Blockchain To-Do List App
To ensure you understand the concept, you first need to learn how the Todo blockchain app will work. We will be using Ethereum to make the app. Our app will be using a single Ethereum node and also have a client-side application. We are going to use Solidity to write the smart contract and then deploy it.
As a developer, you need to use an Ethereum wallet — which is easy to make.
Getting Ready – Environment Creation
To create a local environment, we will need multiple tools and packages. Let’s go through them one by one.
-
Ganache
Ganache is an Ethereum development tool. It lets you manage, deploy, and develop applications, smart contracts, and tests. We are going to run the Windows version for the tutorial. If you have a different operating system, then you can also download the Mac or the Linux version. Once installed, you should be able to utilize it through the command-line tool.
-
Node.js
Node.js is our next tool that needs to be installed. To make the private blockchain run on your machine, you need to install the Node Package Manager.
Once installed, open up your terminal and type the command below. If it runs, then you are good to go.
$node -v
-
MetaMask Ethereum Wallet
As we are going to work on the Ethereum blockchain, we need a wallet that can work from the browser. Metamask is a web browser wallet that lets you interact with the Ethereum blockchain.
-
Truffle Framework
The last software that we are going to install is the Truffle Framework. It offers a wide set of tools that lets you work effectively on your dApp. You can use the Solidity programming language to develop an Ethereum smart contract.
Curious about the Ethereum Technology ? Enroll now: The Complete Ethereum Technology Course
Some of the key Truffle Framework features include the following
- Proper smart contract management
- Networking management
- Automated testing
- Development Console
- Script Runner
- Deployment and Migrations
- Client-Side Development.
To install, you need to use the npm command. Simply run the following command in the command line.
$ npm install -g [email protected]

It will take a while for the installation to complete. Also, note that you need to install the exact version to follow the tutorial.
Setting up the Project
Cool! We now have our development environment ready for use. Now, all we need to do is create our project. To do so, we need to create the project directory. Let’s do it below.
$ mkdir dapp-todo

$ cd dapp-todo

Once you are in the folder, then you need to initiate the truffle project by running the command below.
$ truffle init

Once done, you will be shown a message like above. This means that the folder and files are successfully created. Now, you can open up the folder in your favorite text editor. But before you do that, you need to create the package.json file. This will help you install the dependencies required for the project.
You can manually create the file and then save the contents shown below.
{

  "name": "dapp-todo",

  "version": "1.0.0",

  "description": "Ethereum-powered To-do List",

  "main": "truffle-config.js",

  "directories": {

    "test": "test"

  },

  "scripts": {

    "dev": "lite-server",

    "test": "echo \"Error: no test specified\" && sexit 1"

  },

  "author": "[email protected]",

  "license": "ISC",

  "devDependencies": {

    "bootstrap": "4.1.3",

    "chai": "^4.1.2",

    "chai-as-promised": "^7.1.1",

    "chai-bignumber": "^2.0.2",

    "lite-server": "^2.3.0",

    "nodemon": "^1.17.3",

    "truffle": "5.0.2",

    "truffle-contract": "3.0.6"

  }

}
Once done, now run the following command to install the dependencies.
$ npm install
Understanding the Directory Structure
The directory structure will look like below.

Let’s understand each folder one by one.
- Contracts: The directory contains all the smart contracts. The migrations.sol contract handles the migrations to the blockchain.
- Migrations: The migration directory contains the migration data. It is from here the migrations take place.
- node_modules: It contains all the node modules/dependencies.
- Test: This directory contains the test files.
- truffle-config.js: This file contains the truffle project configuration.
Creating the Smart Contract
It is now time we start with our smart contract creation. Our smart contracts will be stored in the contracts folder. Let’s create a smart contract file named as todo.sol
Once done, you now need to write the code as below.
pragma solidity ^0.5.0;

contract Todo {

// Code here

}
The first line of code specifies which version of Solidity we are using to write the smart contract. Next, we need to use the contract keyword and create a Todo contract. This will contain the code for the smart contract.
Now, let’s add a variable to see if everything is working as intended.
pragma solidity ^0.5.0;

contract Todo {

uint Tasks = 0;

}
Here, we define the tasks variable that will count the number of tasks that we have in our Todo app.
Curious to understand the complete smart contract development lifecycle? Enroll now in Smart Contracts Development Course Now!
Connecting to Ganache
With our smart contract set up correctly in Truffle, we now need to connect to the Ganache private blockchain that we created. To do so, some configuration files need to be updated. We also need to create a migration script and run it so that we can connect to the personal blockchain network.
To get started, we need to update the truffle-config.json file. It should be within the core project directory. Once you open it, copy-paste the following code.
module.exports = {

networks: {

development: {

host: "127.0.0.1",

port: 7545,

network_id: "*" // Network id match

}

},

solc: {

optimizer: {

enabled: true,

runs: 200

}

}

}
With the truffle-config.js file created, it is now time for us to create the migration script so that the smart contract we create can be migrated to the personal blockchain network.
We will file the name as 2_deploy_contracts.js
The migrations are very critical to our Todo app. As blockchain is a type of database, we need to change it from one state to another. This is where migrations help.
To link the migration files, we need to update the add the following code to the newly created migration file.
var Todo = artifacts.require("./Todo.sol");

module.exports = function(deployer) {

deployer.deploy(Todo)

}
The first line of code simply creates a variable that references our smart contract. Once done, we then deploy it.
Once done, now, let’s run the migrate command.
$ Truffle migrate
You can also run the console using the command below.
$truffle console
Developing Our Todo List App
Now that we have successfully run our first Ethereum smart contract, it is now time for us to add features to our dApp. Our dApp is simple. It will list the tasks in our Todo list. We need to use the smart contract to make it happen.
Let’s do it below.
pragma solidity ^0.5.0;

contract Todo {

uint public tasks = 0;

struct Task {

uint id;

string content;

bool completed;

}

}
Here we used a struct keyword to create a new struct Task. We use it to define the structure of our Task, which contains the id, content, and the completed boolean value.
Next, we now need to map our Tasks structure and make it public so that it can be accessed by the blockchain. To do so, we need to add the following line of code.
The smart contract code will now look like below.
pragma solidity ^0.5.0;

contract Todo {

uint public tasks = 0;

struct Task {

uint id;

string content;

bool completed;

}

mapping(uint => Task) public tasks;

}

Lastly, we now need to create a function that handles the tasks.

function createTask(string memory _content) public {

taskCount++;

tasks[taskCount] = Task(taskCount, _content, false)

}
The function is self-explanatory for the most part. We created the function so that it can count the number of tasks that are listed on the Todo dApp.
Finally, we need to create a constructor to initialize the Todo class.
constructor() public {

createTask("This is our first Task")

}

Our todo.sol file should now look like as below.

pragma solidity ^0.5.0;

contract Todo {

uint public tasks = 0;

struct Task {

uint id;

string content;

bool completed;

}

constructor() public {

createTask("This is our first Task")

}

mapping(uint => Task) public tasks;

function createTask(string memory _content) public {

taskCount++;

tasks[taskCount] = Task(taskCount, _content, false)

}

}
Create Tasks
We can also create tasks in our Todo dApp. To do so, we need to create a trigger when a new task is created. Our approach is to create a new event TaskCreated and then add it to our existing createTask() function.
event TaskCreated(

uint id;

string content,

bool completed

);
Now, add the following line to the createTask() function.

emit TaskCreated(taskCount, _content, false);
Completing Tasks
Completing tasks can also be added using event. You need to add the following event to the Todo contract.
event TaskCompleted(

uint id,

bool completed

);

To make it work, you also need to add a new function.

function toggleCompleted(uint _id) public {

Task memory _task = tasks[_id];

_task.completed = !_task.completed;

tasks[_id] = _task;

emit TaskCompleted(_id, _task.completed)

}
Congrats! You have created your first Todo list dApp on Ethereum blockchain.
Ending Note
This also leads us to the end of our how to build a blockchain app tutorial. This is how you build a build blockchain app from scratch. From there, you need to test out the contract properly before you finally migrate it to the blockchain. You can also create the front-end of the app and test it out. If you are not interested in doing so, then you can fire up the console and access the variables and function to test things out!
But if you are still not aware of the implications of blockchain, then we urge you to start our blockchain courses to learn more about it. Without learning or understanding how it works, grasping the programming concept will be really hard for you.


