
Learn how blockchain truly works, master key definitions, and uncover what makes smart contracts so "smart." Dive into the fundamentals, gain valuable insights, and start your blockchain journey today!

- Opinions
101 Blockchains
- on January 26, 2020
How to Build a Blockchain in Python?
If you want to learn how to build a blockchain, then you have come to the right place. Let’s dive deep to learn how you can build a blockchain in python.
There are tons of articles around blockchain, but not all of them talk about building a blockchain from scratch. As a developer, theories are important, but you also need to create a blockchain to understand the concept behind it completely.
The core idea behind blockchains is its decentralized nature. You will be fascinated by the fact of how it all works inside. Blockchain might sound simple, but inside there are a lot of protocols and algorithms that make it happen. We are going to use Python to create a blockchain from scratch.
You can also save the article and bookmark it as, “How to build our blockchain.” Believe me; the article will help you in the long run.
Build your identity as a certified blockchain expert with 101 Blockchains’ Blockchain Certifications designed to provide enhanced career prospects.
How To Build A Blockchain
The best way to learn anything is to learn by doing. To make sure you are on the same page as me, let’s check out the requirements first. We will also briefly describe blockchain so that we both are on the same page.
Please include attribution to 101blockchains.com with this graphic. <a href='https://101blockchains.com/blockchain-infographics/'> <img src='https://101blockchains.com/wp-content/uploads/2020/01/How-to-Build-A-Blockchain-In-Python.png' alt='How to Build A Blockchain In Python='0' /> </a>
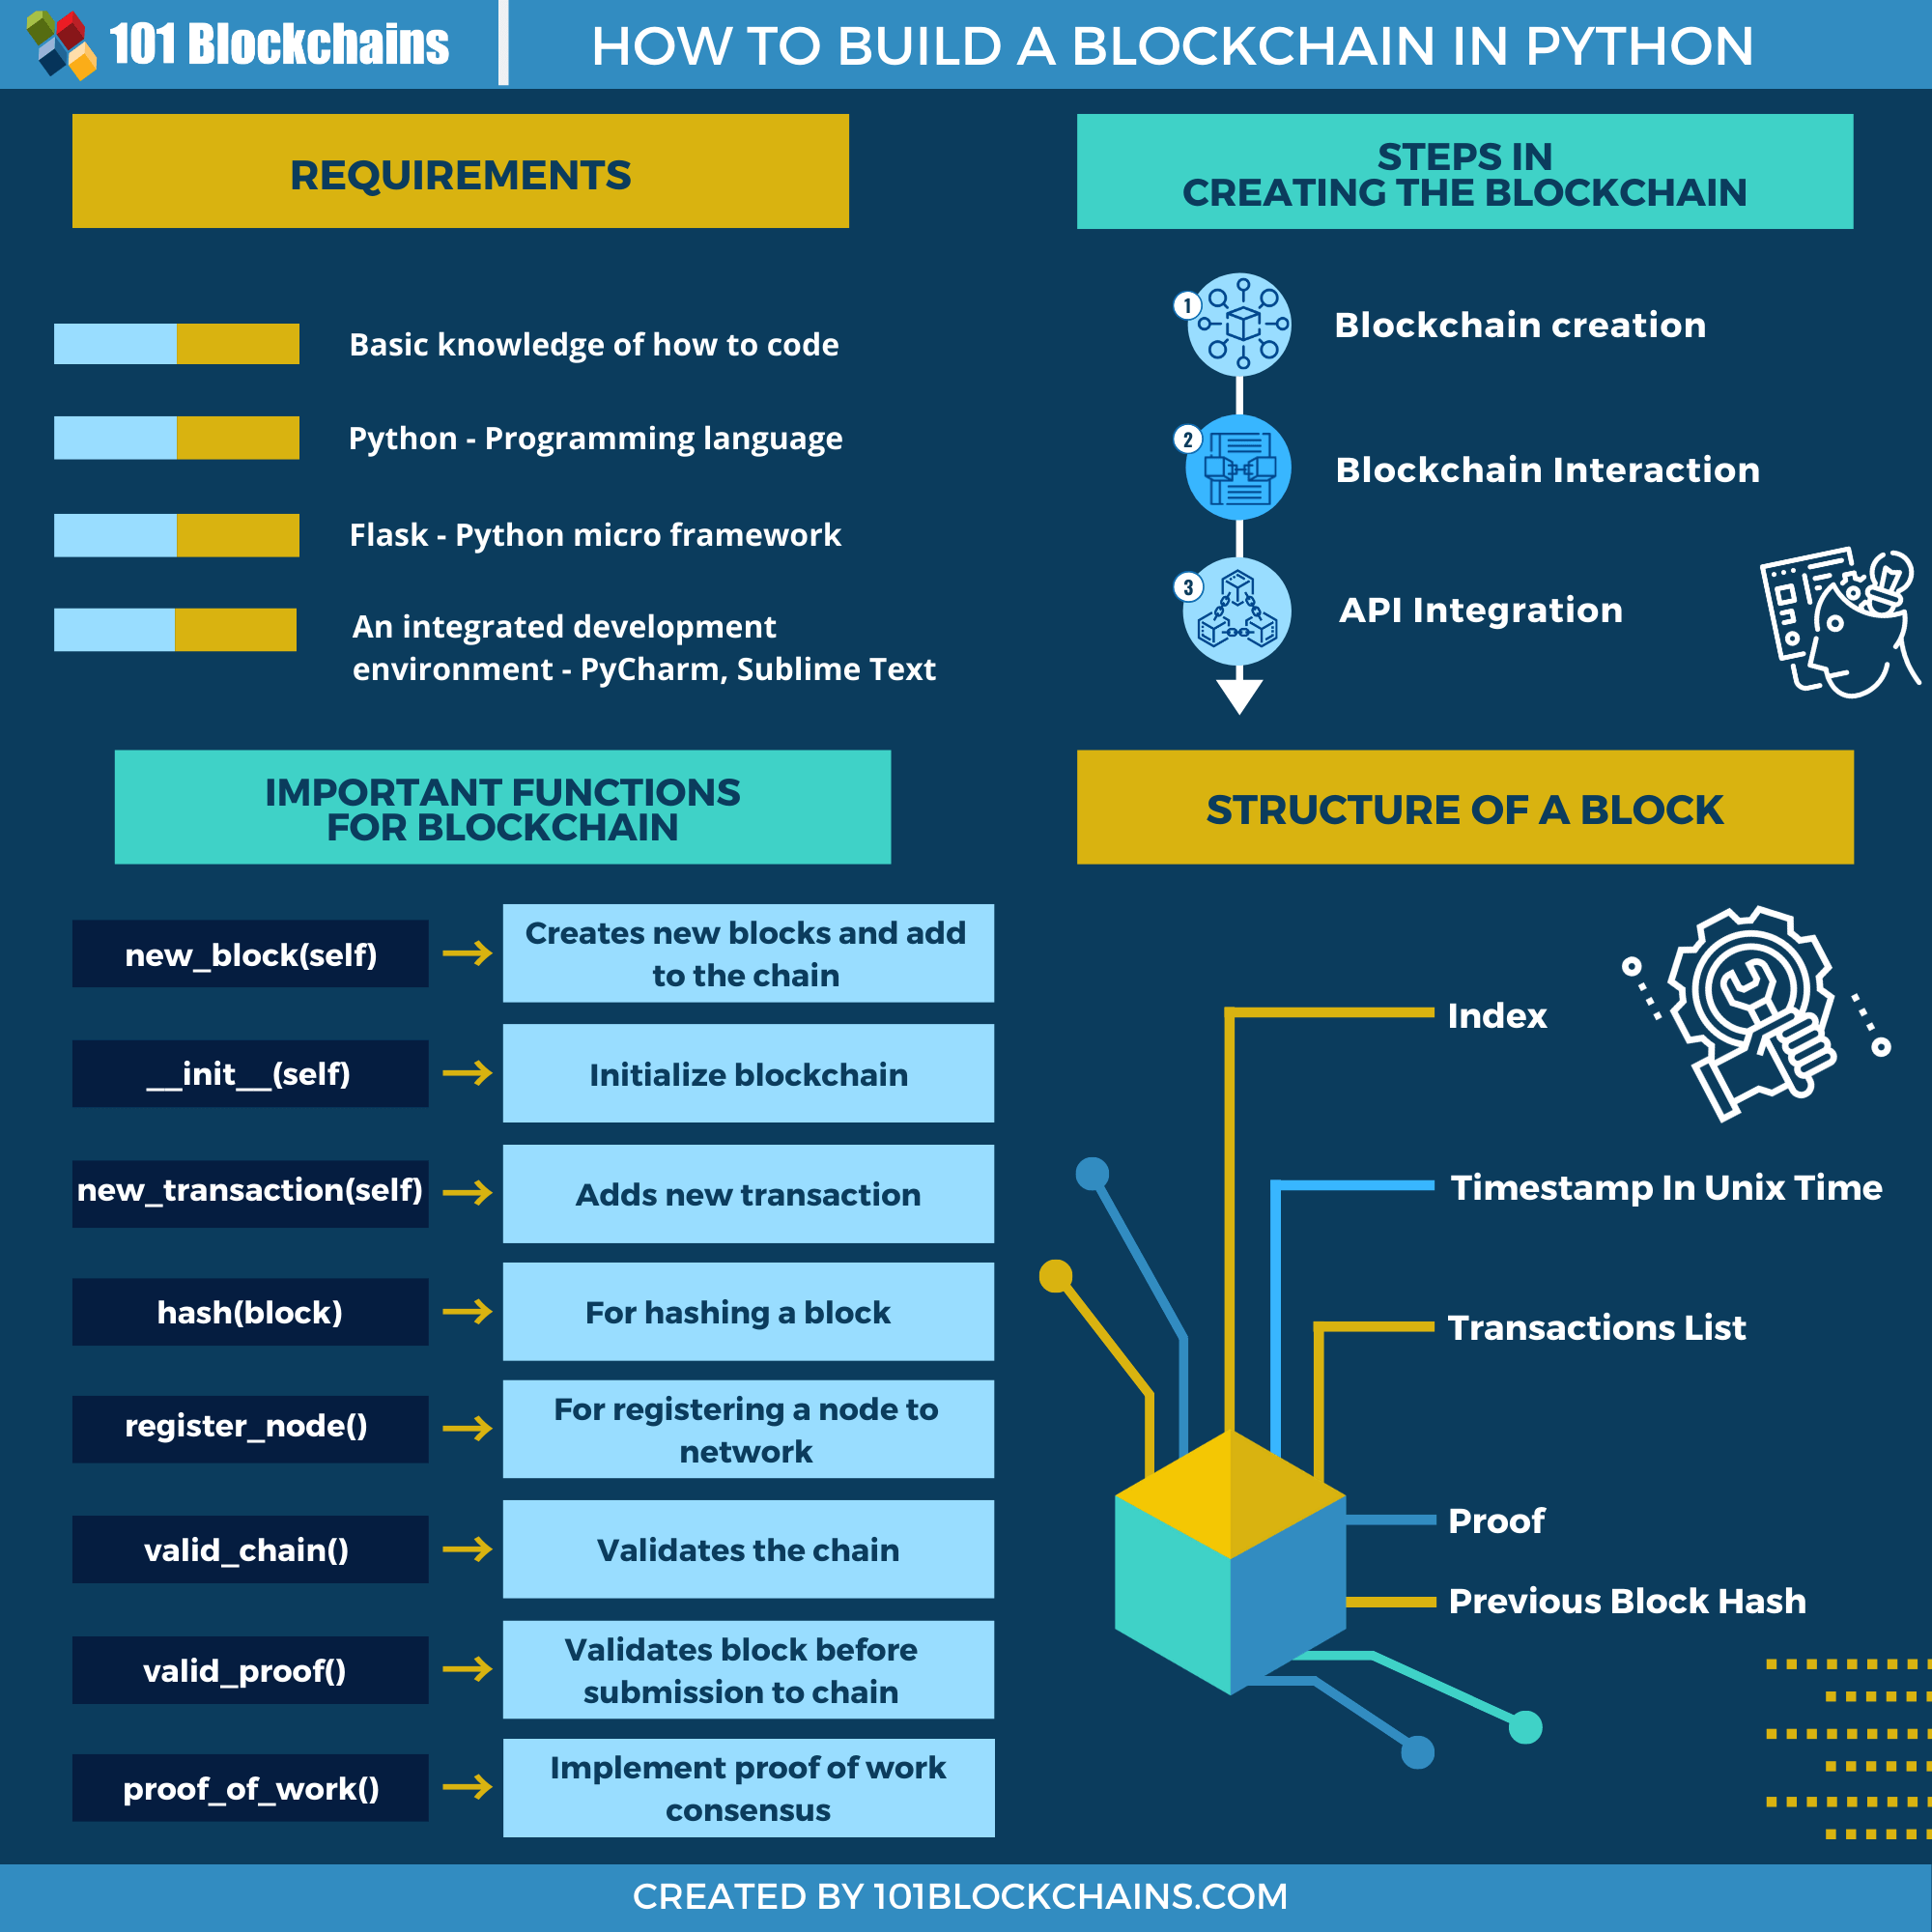
Requirement
The basic requirement to follow the guide is to know how to code. If you have never coded in your life, then this guide is not for you. I recommend checking out the various beginner-level courses that are available online. I recommend EdX, Udacity, and Coursera for the best learning experience.
You already a coder? Then, you should know about basic Python. Also, it will help you to follow the “How To Build A Blockchain” tutorial.
We created the tutorial so anyone can follow. So, if you do not know and want to learn how to build a blockchain from scratch, you are welcome to do so!
If you do not know Python, do not worry as it is easy to pick up. Check out the Python documentation to get started.
We are going to use Python 3.6+ for the tutorial. If you decide to use other versions of Python, then you might have to do more research for the code to work. For tutorial purposes, I recommend installing the version that I am using.
Lastly, you should also know about HTTP — the protocol that is used to communicate between two parties on the internet.
Installing Python using pip
You need to install Python using pip. You also need to install wonderful Requests and Flask library. To do so, simply run the command below.
$pip install Flask==0.12.2 requests==2.18.4
If you are using the Windows environment, you can directly go to python.org to download the latest version of Python.
As for me, I downloaded the Python 3.8.1 — the latest build at the time of writing the tutorial.
For the IDE, I prefer using PyCharm. I am using the Python Community edition for the tutorial. You are free to use any IDE of your choice. Another great alternative is Visual Studio Code — a free, open-source integrated development environment.
The last tool that you are going to need is Postman — an HTTP client. Alternatively, you can also use cURL.
I also recommend installing a virtual environment to create a completely different environment for your development. You can follow this guide to set it up properly.

Blockchain Revisited
Before we go and build the blockchain, we need to refresh our idea of blockchain. This will help us to stay on the same page.
Blockchain is a distributed ledger technology where peers can participate, interact, and execute transactions without the need for a centralized entity. Each peer has a copy of the ledger, which makes it impossible for hackers to do fraud in the system. The key features of blockchain include transparency, immutability, and security. It utilizes advanced cryptocurrency algorithms to ensure data security. Also, to reach consensus, a blockchain network will utilize consensus algorithms such as Proof-of-Work, Proof-of-Stake, and so on.
Start your blockchain journey Now with the Enterprise Blockchains Fundamentals
Getting Started With Building a Blockchain
With all the prerequisite installations done, we are now ready to get started with our tutorial, “How to Build A Blockchain.”
To get started, you need to create a blockchain.py file.
1. Blockchain Creation
The first step is to make a functional blockchain solution. At first, we need to create a Blockchain class. There we will create a constructor that will initiate the chain and transaction list. The chain list will store our blockchain, whereas the transactions will be stored in the current_transacations array.
def __init__(self):

   self.chain = []

   self.current_transactions = []
Next, we need to create a new_block function which will be used to create new blocks and then add them to the existing chain. The code for the new_block function is as below:
def new_block(self):

   #This function creates new blocks and then adds to the existing chain

   pass
The new_transcaction method will create a new transaction and then add the transaction to the already existing transaction list.
def new_transaction(self):

   #This function adds a new transaction to already existing transactions

   pass
We also have a hash function that is used to create the hash for a block.
 @staticmethod

def hash(block):

   #Used for hashing a block
The last function that we are going to create last_block. It is used to call the last block in the chain.
We can also create three more functions here.
- register_node() → To register a new node and add it to the network
- valid_proof() → Will ensure wheather a submitted block to the chain solves the problem
- valid_chain() → This will check if the subsequent blocks in the chain are valid or not.
The blueprint for the blockchain.py looks as below.
class Blockchain(object):

   def __init__(self):

       self.chain = []

       self.current_transactions = []


   def new_block(self):

       #This function creates new blocks and then adds to the existing chain

       pass


   def new_transaction(self):

       #This function adds a new transaction to already existing transactions

       pass


   @staticmethod

   def hash(block):

       #Used for hashing a block


   @property

   def last_block(self):

       # Calls and returns the last block of the chain

       pass
The Blockchain class manages the whole chain. The definitions defined under the class manages the different actions within the blockchain.
Let’s go through each one of the methods below.
Structure of a block
A block contains vital information about transactions and chains. Any block on the chain will contain the following information
- index
- timestamp in Unix time
- transactions list
- proof
- Previous block hash
Most of the information within the block are self-explanatory. Here, the two crucial variables are the previous_hash, which contains the hash value of the previous block. This is important as it makes sure that the blockchain is immutable, and no malicious actor can update, delete or add any data to the chain.
Adding Transaction To A Block
With the structure of the block understood, let’s now learn how to add a transaction to the block. The code for it is as below.
def new_transaction(self):

   #This function adds a new transaction to already existing transactions

   """This will create a new transaction which will be sent to the next block. It will contain

   three variables including sender, recipient and amount

   """

   self.current_transactions.append(

       {

           'sender': sender,

           'recipient': recipient

           'amount': amount,

       }

   )

   return self.last_block['index'] + 1
As you can see, it simply appends the current_transaction list with an object that contains three variables → sender, recipient, amount.
Once the addition is done, the method then sends the block index to the chain. It is the next block that is going to be mined.
Start learning Blockchain with World’s first Blockchain Skill Paths with quality resources tailored by industry experts Now!
Creating new Blocks
Before we start creating new blocks, we need to create the genesis block. To do so, we need to use a simple line of code as below.
self.new_block(previous_hash=1, proof=100)
This line should be added to your Blockchain class.
For the new_block() method, you need to send two variables as its parameters. It includes proof and previous_hash.
Now, let’s take a look at the new_block() method below.
def new_block(self, proof, previous_hash=None):

   #This function creates new blocks and then adds to the existing chain

   """This method will contain two parameters proof, previous hash"""

   block = {

       'index': len(self.chain) + 1,

       'timestamp' : time(),

       'proof': proof,

       previous_hash: previous_hash or self.hash(self.chain[-1]),

   }
# Set the current transaction list to empty.
   self.current_transactions=[]

   self.chain.append(block)

   return block
Let’s explain the code of the new_block. We create a block list which contains the three important parameters. Once they are defined, we then also write the code to reset the current_transaction list and then append the block to the chain. The new_block method, when called, returns the block.
Let’s also define the last_block method below.
@property
def last_block(self):
# Calls and returns the last block of the chain
return self.chain[-1]
Also, the code for the hash() method is as below:
def hash(block):

   #Used for hashing a block

   """The follow code will create a SHA-256 block hash and also ensure that the dictionary is ordered"""

   block_string = json.dumps(block, sort_keys=True).encode()

   return hashlib.sha256(block_string).hexdigest()
If you combine all the code until now, we will have the following blockchain.py. Check it out below.
class Blockchain(object):

   def __init__(self):

       self.chain = []

       self.current_transactions = []

       self.new_block(previous_hash=1, proof=100)

   def new_block(self, proof, previous_hash=None):

       #This function creates new blocks and then adds to the existing chain

       """This method will contain two parameters proof, previous hash"""

       block = {

           'index': len(self.chain) + 1,

           'timestamp' : time(),

           'proof': proof,

           previous_hash: previous_hash or self.hash(self.chain[-1]),

       }

       # Set the current transaction list to empty.

       self.current_transactions=[]

       self.chain.append(block)

       return block

   def new_transaction(self):

       #This function adds a new transaction to already existing transactions

       """This will create a new transaction which will be sent to the next block. It will contain

       three variables including sender, recipient and amount

       """

       self.current_transactions.append(

           {

               'sender': sender,

               'recipient': recipient,

               'amount': amount,

           }

       )

       return self.last_block['index'] + 1

   @staticmethod

   def hash(block):

       #Used for hashing a block

       """The follow code will create a SHA-256 block hash and also ensure that the dictionary is ordered"""

       block_string = json.dumps(block, sort_keys=True).encode()

       return hashlib.sha256(block_string).hexdigest()

   @property

   def last_block(self):

       # Calls and returns the last block of the chain

       return self.chain[-1]
Not sure how to build your career in enterprise blockchains? Enroll Now in How to Build Your Career in Enterprise Blockchains Course
Proof of Work Implementation
Our next step in building blockchain.py is the Proof-of-Work implementation.
So, what is Proof of Work? It is a consensus method that is utilized to add new blocks into the chain. It poses a challenge to the miner, and once the miner solves the problem, the block is then verified. The miner, in return, gets a reward based on the problem complexity.
Bitcoin’s Proof of Work is known as Hashcash. It ensures that the bitcoin network consensus work as intended.
Let’s define the proof_of_work() method. The method will be part of the Blockchain class.
def proof_of_work(self, last_proof):

   """This method is where you the consensus algorithm is implemented.

   It takes two parameters including self and last_proof"""

   proof = 0

   while self.valid_proof(last_proof, proof) is False:

       proof +=1

   return proof

@staticmethod

def valid_proof(last_proof, proof):

   """This method validates the block"""

   guess = f'{last_proof}{proof}'.encode()

   guess_hash = hashlib.sha256(guess).hexigest()

   return guess_hash[:4] == "0000"
The first proof_of_work method is simple; it simply set proof to 0 and then run a while loop to run the valid_proof method. If it is False, then add one to the proof.
You can increase the difficulty of the hash by adding more zeroes.
This leads us to the end of our Blockchain.py. Our code stands as below.
class Blockchain(object):

   def __init__(self):

       self.chain = []

       self.current_transactions = []

       self.new_block(previous_hash=1, proof=100)
   def proof_of_work(self, last_proof):

       """This method is where you the consensus algorithm is implemented.

       It takes two parameters including self and last_proof"""

       proof = 0

       while self.valid_proof(last_proof, proof) is False:

           proof +=1

       return proof

   @staticmethod

   def valid_proof(last_proof, proof):

       """This method validates the block"""

       guess = f'{last_proof}{proof}'.encode()

       guess_hash = hashlib.sha256(guess).hexigest()

       return guess_hash[:4] == "0000"

   def new_block(self, proof, previous_hash=None):

       #This function creates new blocks and then adds to the existing chain

       """This method will contain two parameters proof, previous hash"""

       block = {

           'index': len(self.chain) + 1,

           'timestamp' : time(),

           'proof': proof,

           previous_hash: previous_hash or self.hash(self.chain[-1]),

       }

       # Set the current transaction list to empty.

       self.current_transactions=[]

       self.chain.append(block)

       return block

   def new_transaction(self):

       #This function adds a new transaction to already existing transactions

       """This will create a new transaction which will be sent to the next block. It will contain

       three variables including sender, recipient and amount

       """

       self.current_transactions.append(

           {

               'sender': sender,

               'recipient': recipient,

               'amount': amount,

           }

       )
return self.last_block[‘index’] + 1
@staticmethod
def hash(block):
#Used for hashing a block
“””The follow code will create a SHA-256 block hash and also ensure that the dictionary is ordered”””
block_string = json.dumps(block, sort_keys=True).encode()
return hashlib.sha256(block_string).hexdigest()
@property
def last_block(self):
# Calls and returns the last block of the chain
return self.chain[-1]
Curious to learn about blockchain implementation and strategy for managing your blockchain projects? Enroll Now in Blockchain Technology – Implementation And Strategy Course!
2. API Integration
Great, we create a blockchain that works! Now, to use it effectively, we need to create an API(Application Programming Interface).
To do so, we are going to use the popular Python Framework: Flask.
Flask is a micro-framework, which means that it is lightweight, and you can add the libraries that you need. It also enables you to create Python function endpoint easily.
To create APIs, we first need to ensure our blockchain can accept requests over HTTP. To do so, we have to create more methods.
Now, we will modify the blockchain.py.
# Creating the app node

app = Flask(__name__)

node_identifier = str(uuid4()).replace('-','')

# Initializing blockchain

blockchain = Blockchain()

@app.route('/mine', methods=['GET'])

def mine():

   return "Mining a new Block"


@app.route('/transactions/new', methods=['POST'])

def new_transaction():

   return "Adding a new transaction"


@app.router('/chain', methods=['GET'])


def full_chain():

   response = {

       'chain' : blockchain.chain,

       'length' : len(blockchain.chain)

   }

   return jsonify(response), 200


if __name__ == '__main__':

   app.run(host="0.0.0.0", port=5000)
The code is self-explanatory for the most part. We first do a node initiation. Next, we create a random node. Once done, we then initialize our Blockchain class. Once done, we need to create three endpoints as below.
- /mine endpoint
- /transactions/new endpoint
- /chain endpoint
Finally, we run the server on 5000 port.
The app is now almost created. All we need to do is create the transactions class method.
@app.route('/transactions/new', methods=['POST'])

   def new_transaction():

       values = request.get_json()

       # Checking if the required data is there or not

       required = ['sender','recipient','amount']

       if not all(k in values for k in required):

           return 'Missing values', 400


       # creating a new transaction

       index = blockchain.new_transaction(values['sender'], values['recipient', values['amount']])

       response = {'message': f’Transaction is scheduled to be added to Block No. {index}'}

       return jsonify(response), 201
Mining Endpoint
The last endpoint that we are going to create is the mining endpoint. To do so, we have to make sure that it does the following three things.
- Proof of Work calculation
- Forge new blockchain and then add it to the chain
- Reward the miner for his work
@app.route('/mine', methods=['GET'])

def mine():

   """Here we make the proof of work algorithm work"""

   last_block = blockchain.last_block

   last_proof = last_block['proof']

   proof = blockchain.proof_of_work(last_proof)


   # rewarding the miner for his contribution. 0 specifies new coin has been mined

   blockchain.new_transaction(

       sender="0",

       recipient = node_identifier,

       amount = 1,

   )


   # now create the new block and add it to the chain

   previous_hash = blockchain.hash(last_block)

   block = blockchain.new_block(proof, previous_hash)


   response = {

       'message': 'The new block has been forged',

       'index': block['index'],

       'transactions': block['transactions'],

       'proof': block['proof'],

       'previous_hash' : block['previous_hash']

   }

   return jsonify(response), 200
3. Blockchain Interaction
The last step is to interact with the blockchain. We are going to use Postman to interact with the blockchain network using the API we just created.
Run the code below on the Python Console
python blockchain.py
Aspiring to make a lucrative career as a blockchain developer but not sure how? Check the detailed guide Now on How To Become Blockchain Developer?
Conclusion
This leads us to the end of our How to build a blockchain. Hope the steps and codes above will help you build a Blockchain in Python. So, if you are a novice and aspiring to build a career in Blockchain, we suggest you start your blockchain career with our Free Blockchain Fundamentals Course. Choose us as your study partner and we’ll have you until you don’t get your dream job.


1 Comment
Great Information to build a blockchain app in python. It’s very practical and helpful guide. Thanks for sharing such a piece of wonderful information